Since getting my license in 2024 I’ve spent most of my time on 10 meters. My only always-up antenna is a mag-mounted 10 meter vertical on my chimney. Occasionally I’ll setup my multi-band vertical out in the front yard and play around.
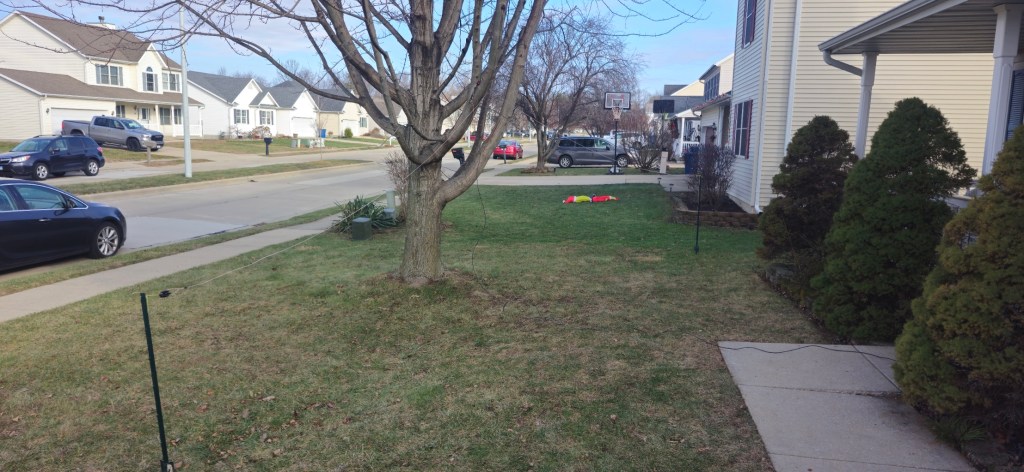
Yesterday I decided to try making my own 20 meter, half-wave dipole. I used 16 gauge speaker wire, a BNC-to-banana binding post (plus various adapters I had on-hand), two insulators, and a pair of metal garden fence posts.
This is the first time I’ve tried using something other than a purchased antenna and I’m certain it’s deployed sub-optimally. It is low to the ground, in a slightly sloping, inverted v configuration. To say I didn’t have my hopes up would be an understatement.
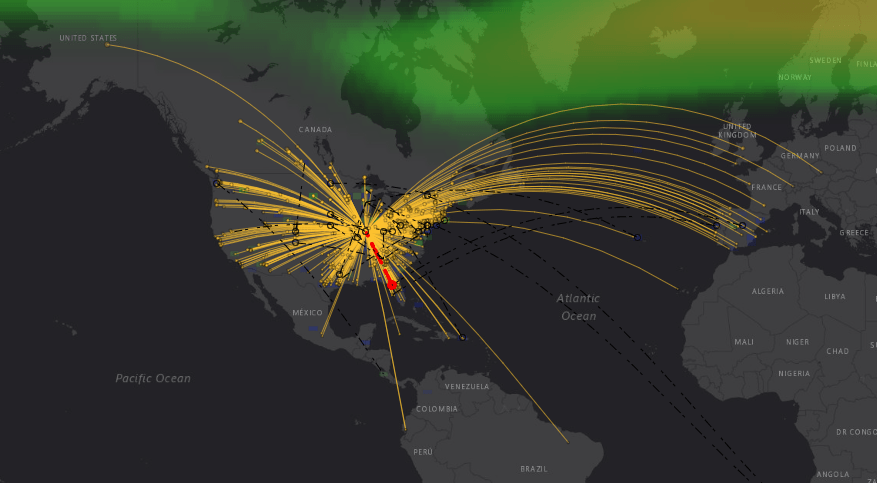
Imagine my surprise to see this when I fired up FT8.
And my transmissions were getting out well, too.
I had no issues getting onto Single Side Band voice and making contacts around the country. In addition, I fired off an email using Winlink with Vara HF via a station several hundred miles away.
So there we go. This was a low-effort attempt that was actually useful. I’m impressed.
Last week an advertisement popped up for a radio mount for my truck which caught my attention. It hangs from a cupholder and doesn’t require any drilling or modifications to the vehicle. For the past 8 months I’ve had my radio sitting in a less-than-ideal spot and previous searches didn’t reveal this option.
It arrived yesterday and I was quick to get it installed. It’s perfect! It even works with a phone holder I have in the same cupholder. And no rattling!
So if you’re looking for a non-invasive way to securly hold your radio, made specifically for your truck model, check them out. Skymo Radio Gear Company.
Two weeks ago I moved my main antenna from my front yard to the first floor roof – above my garage. I was skeptical of how well it was going to work, but tried it anyway, screen and all.
The results were positive – that little antenna continued to do great for DX on 10 meters and the new position provided an improvement for the local 2 meter and 70cm nets. I was sold!
It just didn’t look great with a mag mount antenna, sitting off kilter on the roof.
Two days ago I ordered 75′ of coax and it was delivered today. As I sat at my desk after work, poking around on FT-8, I couldn’t resist the urge to see how it would do on the SECOND story roof. Longtime followers may remember many years ago I had a wifi antenna up on the (fake) chimney column, so I’ve been itching to see what this antenna would do up there. 30 minutes and a nervous climb later, the mag mount was happily resting on the chimney column. (No photos, I didn’t take my phone up with me).
The real test came later tonight when I tuned into the local ARES Simplex net – one I’ve historically struggled with. I’m usually hear a fraction of the operators, and only a handful hear me.
Not tonight! All but one was crystal clear and many reported hearing me very well. YES!
So now the research will begin for a more permanent antenna, but this one will do for a little while! You know what they say about permanent temporary solutions… 🙂
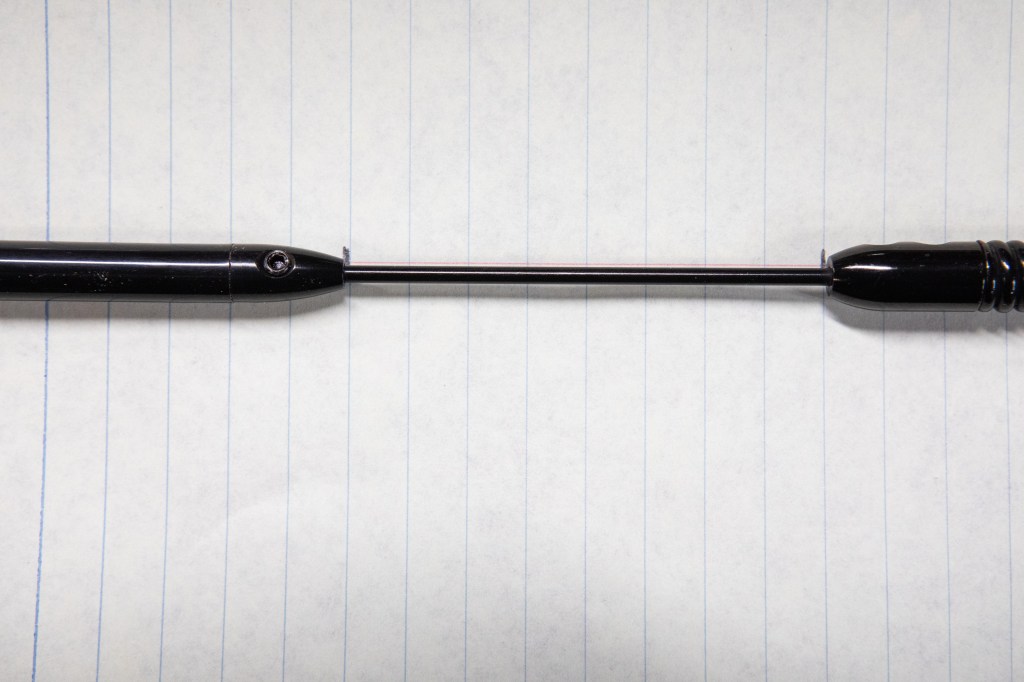
It has worked very well except for one major annoyance. Wind noise above 60mph. As soon as I go over 60, the high-pitched whistling gets louder and louder. After 6 hours in the car last weekend, I just couldn’t stand it anymore. The thought of highway speeds for an extended period of time makes me want to take the antenna off.
After noticing the stock antenna’s spiraling wire running its length, followed by some googling, I learned that that is a common way to avoid the noise I’m experiencing. I saw a few forum posts about DIY’ing it with string and heat-shrink tubing. So that’s what I set out to do this morning.
The first step was to disassemble the antenna so I could get the small segment wrapped, capturing the distance between segments before taking them apart.
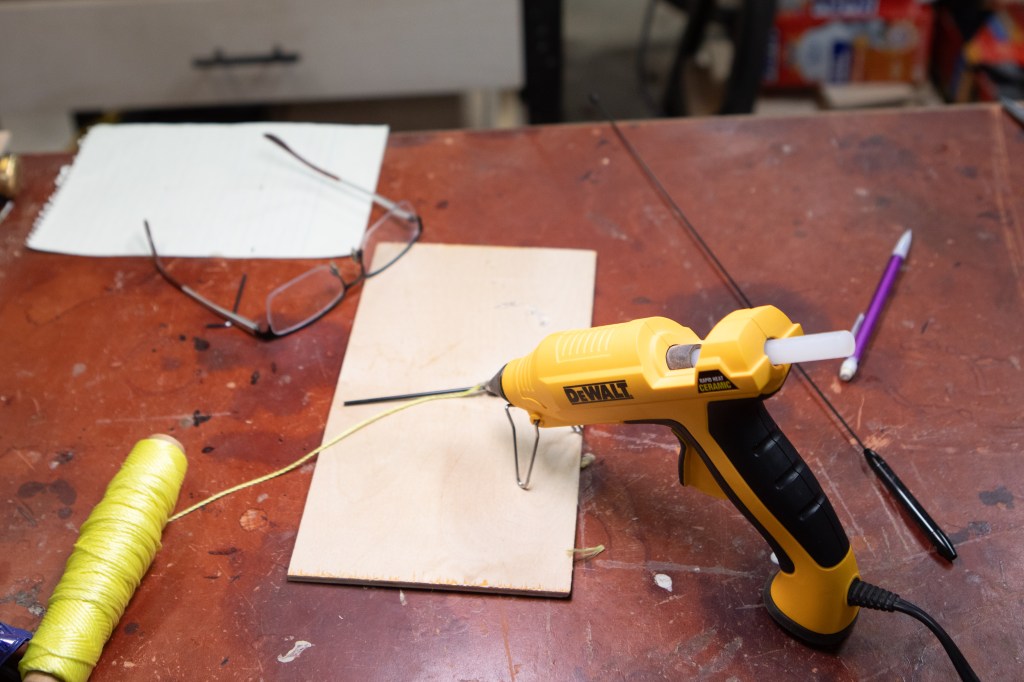
Next was to spiral some nylon string around this small segment. Keeping the string in place was tricky until I pulled out the hot glue gun and tacked it into place.
Once secured on one end, it was easy to wrap the string and slide the heat shrink tubing over it and into place. I used 1/4″, 3:1 tubing from Amazon.
Tubing heated, it looks pretty good!
I repeated the process for the main antenna segment, again using small dabs of hot glue at strategic locations – top, middle, bottom.
After sliding the tubing over this section and heating it, it didn’t look horrible.
The real test was getting out on the interstate. Sure enough, at well above 60 Mph there’s no annoying whistling!
It is worth noting that the antenna is significantly thicker, and a tad bit heavier now. As such, it bends much more in the wind. Thankfully it doesn’t appear to impact receiving or transmitting; I tossed out my callsign and quickly got a response with a good signal report (thanks KD9WHG!).
I’ve grown tired of being disorganized with respect to getting on the air and having “everything” I want at my fingertips. I’m often grabbing a random pencil and notebook to scribble callsigns and feel like nothing is at hand when I need it.
I have some difficulty copying callsigns as I hear them. It’s almost like in one ear and out the other. So to combat this I’m writing them down on paper as I hear them. I tried using digital logging software but found that too cumbersome for this purpose, and often end up with dozens of instances of Windows Notepad open with partial callsigns recorded.
Then there’s the random bits of information I need to look up. I end up with dozens of open tabs to keep looking up various things: q codes; abbreviations; band plans; and more.
Add to this the expectation that as it warms up outside, and we’re on the road with the camper, I won’t always have my computer (and internet) with me at all times.
All of this brought me to the conclusion that I need to put together a comprehensive set of reference and logging material. So that’s what I’ve done.
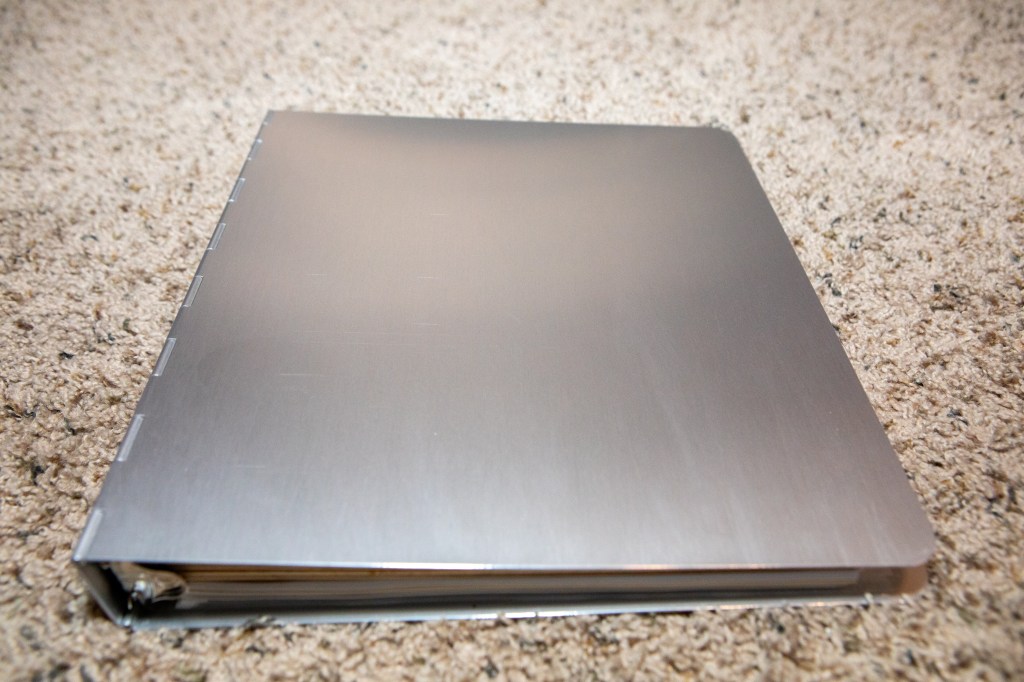
I bought an 1″, aluminum, three-ring binder and put together what I think will be my workspace for playing on the radio. Let’s have a look at it.
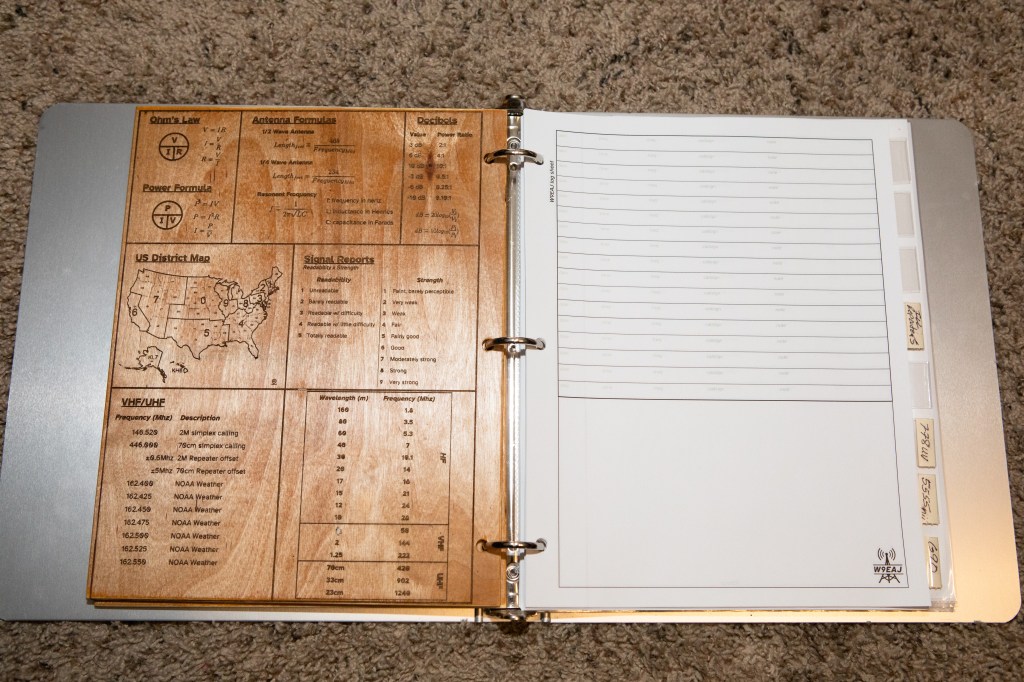
I had plans of laser engraving more permanent information (think band charts, phonetic alphabet) on sheets of anodized aluminum for inclusion in the binder but that plan fell through when I couldn’t find suitable material.
So I went with what else I know how to work with – wood! I have two sheets of 1/4″ plywood, laser engraved on both sides, with a bunch of information I think I might need in a session.
NATO Alphabet, CW, Q Codes, Abbreviations and more.Common freqencies, ARRL band chartMiscellaneous bits
In the last photo there, you can see the custom logging pages I created – with a nice scratch area on the bottom for jotting my notes.
Some of the other things in the binder include:
Small copies of my radio manuals (printed pages 4-to-1)
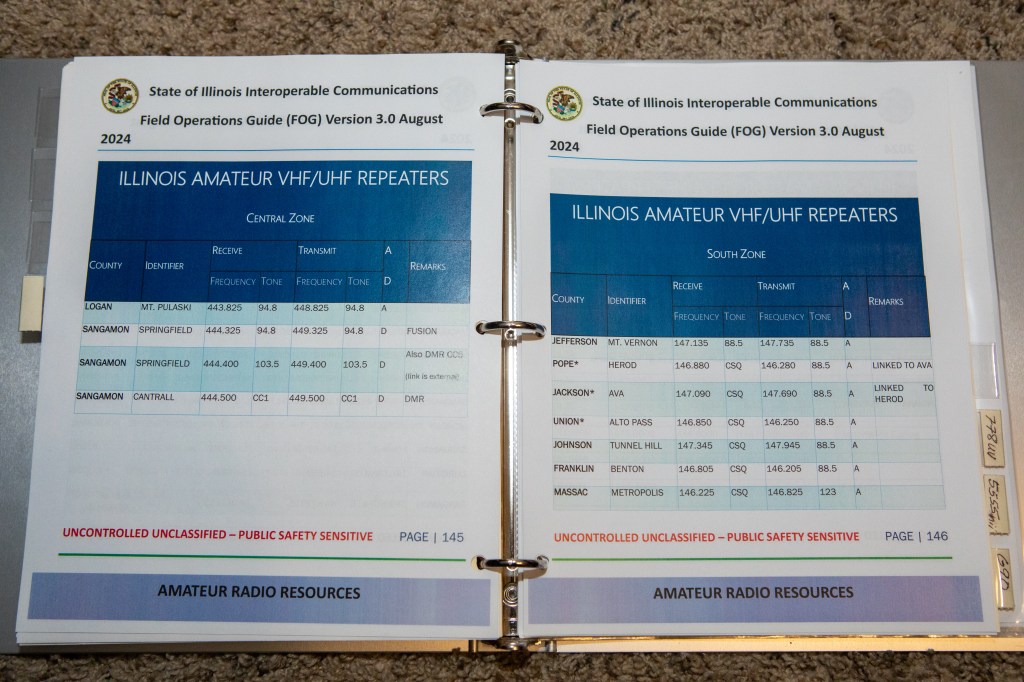
What I’m calling a Location Guide for Springfield, which will serve as a template for places we travel. This includes:
Repeaters
Local nets
Urls
High-level map
My first “Location Guide”Excerpt from the IEMA Field Operations GuideOne of my manuals, the G90.
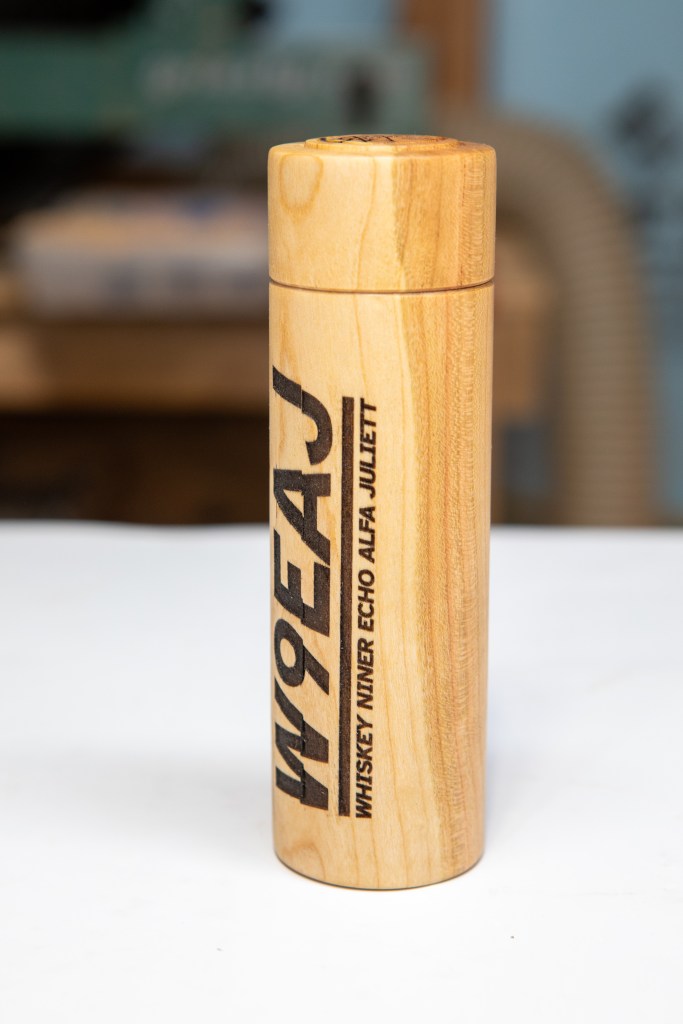
And of couse, I just had to make a new mechanical pencil I’m going to keep in my new pencil case, just for radio use:)
I have to say, putting this all together has been fun. I’ve used it a couple of times already and it has made a big difference in my frustration level. Everything is where I need it, it’s easy to take off the shelf and easy put away when I’m done. I expect this will be important when I eventually go mobile.
If you’d like to see any of this in better detail, just let me know.
Since I only started in ham radio recently, and I haven’t gotten a permanent antenna setup yet, I’ve been running with a 10 meter vertical sitting in my front yard on a “magic carpet”, also known as a screen door screen. Fancy, isn’t it?
I put it out there quickly before we had a bunch of snow so I could at least play on the radio during the inclement weather. Much to my surprise it was worked wonderfully. I’ve gotten to do FT-8, a little JS8Call, had voice calls with Europe, and sent emails with winlink. It has really far outperformed my expectations.
This week is the first time I’ve been able to even see the screen, it has been covered in snow for weeks. It’s finally warming up a little and everything is melting, though it did freeze overnight.
And that’s where today’s troubleshooting began. I noticed my SWR was up over 2 (usually less than 1.5) on 10m. I spent quite a bit of time outside with the NanoVNA trying to figure out what changed – and every time I tried something, it just got worse.
I noticed there were frozen water droplets all over the screen, could that be what’s wrong? I set the screen out in the sun for an hour and let it all melt. After putting things back into place (actually a better location so the coax isn’t crossing our walkway), I’m happy to report an SWR of 1.1 right at 28.5Mhz!
It’s it silly how many times the government issues a license or “important” document, one which you’re supposed to carry with you, and it’s just a piece of paper?
That’s how these ham radio licenses are. Print-at-home, cut-and-fold, watch die in your wallet.
I figured, hey, I have a laser engraver. Why not have a little fun with it and make something a little more robust. A quick search on Amazon netted me an inexpensive set of card-sized anodized aluminum cards. A little time in Lighburn later, I had my double-sided, engraved metal ham radio license.
This is actually my second copy, which I made after upgrading to a General license and changing my callsign.
Having gotten into ham radio, I’ve been assembling a small, portable kit of essentials for getting on the air and making contacts. Because I have a hard time hearing and recalling callsigns, I write down their fragments as I hear them if I am not by a computer for immediate logging. So I need to have pens and pencils at hand.
Enter, my new cherry pencil case.
I then used my laser engraver to put my brand new callsign on it. Well, that was the plan anyway. I ran into the all-too-common problem of the Laserpecker LX1 freezing mid-engraving and had a LOT of trouble trying to get it to restart exactly where it left off. That was further complicated because the rotary was involved.
The result is that it looks great from a distance, but up close just makes me cringe. Oh well, it’s mine and will still hold a few pens and pencils just fine. It was a great proof of concept and was fun to mix a few hobbies.
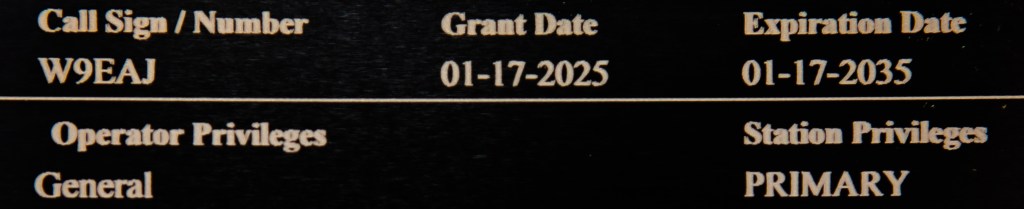
Upon upgrading my amateur radio license to General last month, I begin looking for a vanity callsign to replace my KE9BPH originally issued when I first got my Technician license. I know I hadn’t been at this radio thing very long, but I was continually fumbling when trying to clearly speak the callsign. Difficult to remember, difficult to speak, just didn’t care for it.
I spent quite a bit of time on RadioQTH – Available Calls but did not find any I liked. Then I read the fine print and learned that just because it doesn’t return as an option does not mean it’s unavailable. If a callsign has never been used, it won’t show up in those results!
And that’s when I stumbled upon what is now, as of January 17th, 2025, my new callsign – W9EAJ. Easier to remember, easier to say, and quicker for me to identity. Win win.
It has now been a few months since my first interaction with ham radio. In that time I’ve: passed the Technician and General tests; purchased and learned how to program a pair of handsets; purchased and programmed a mobile UHF/VHF radio for my truck; added an antenna to the truck; and setup and used a pair of HF radios to get on the 10 meter band, making a dozen or so long distance contacts.
It’s been fun and full of learning. Here are a few things, in no particular order, which come to mind from my experience thus far:
The wide variety of power/connectivty options is frustrating, particularly since there is nowhere local to buy this stuff.
Ditto with the numerous coax connections and adapters.
I’m terrible at copying callsigns. It’s as if, by default, my brain has a 3 character buffer which, by the end of the callsign I hear, has discarded the beginning. I’ve taken to pencil and paper to write down callsigns calling CQ – it often takes hearing it multiple times, between radio noise and accents, to get it correct.
Antennas are confusing, I need to learn more here.
I need to figure out a permanent antenna setup, the small vertical in my front yard is less than ideal.
NanoVNA is a great learning tool.
I’m appreciative of AnyTone products – they’re workable at a great price.
I need to get the aforementioned connectors, adapters, jumpers, tools, etc. organized.
The local hams are friendly and eager to help.
The patchwork of software and systems everyone relies on is reminiscent of early personal computing days, and the BBS scene. I was surprised by this, and it’s a little refreshing.
I need to settle on a logging system.
I’m still hesitant to key up on the local repeater in response to chatter.
Putting names to callsigns takes some time.
So that’s what comes to mind as I sit here this evening. Maybe I’ll update the list if more things come up.